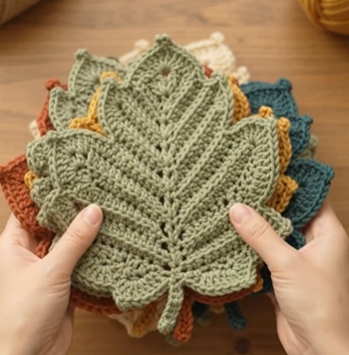
Full Original Crochet Pattern
Create a cozy autumn leaf coaster using cotton yarn and simple crochet stitches. This pattern is designed so the finished piece has a recognizable leaf shape, defined points, a center vein, and a small stem.
Skill Level: Beginner–Intermediate
Crochet Terms: US terminology
Finished Size: Approximately 5–5½ in (13–14 cm) long
Time: Approximately 30–45 minutes per coaster
🧶 Materials
- Worsted-weight cotton yarn
- 4.0 mm crochet hook
- Scissors
- Yarn needle
- Stitch marker, optional
- Measuring tape, optional
- Blocking mat or towel, optional
Recommended Colors
For an autumn set, try:
- Burnt orange
- Mustard yellow
- Rust
- Deep red
- Olive green
- Brown
You can make every coaster a different autumn color.
📖 Abbreviations
US crochet terminology:
| Abbreviation | Meaning |
|---|---|
| ch | Chain |
| sl st | Slip stitch |
| sc | Single crochet |
| hdc | Half double crochet |
| dc | Double crochet |
| tr | Treble crochet |
| st | Stitch |
| sts | Stitches |
| sk | Skip |
| inc | Increase |
🍁 Before You Start
The coaster is worked from the center toward the outside.
The first rounds create the central body of the leaf. Later sections create the pointed sides and the characteristic leaf silhouette.
Important
Do not pull your stitches too tightly.
A coaster needs to lie reasonably flat. If your work starts forming a bowl, your tension is probably too tight.
If the outer edge becomes slightly wavy, that is okay. Gentle blocking at the end will help.
🍂 PART 1 — CENTER OF THE LEAF
Round 1
Make a magic ring.
If you prefer not to use a magic ring, chain 4 and join with a slip stitch to form a small ring.
Chain 2.
Work 10 dc into the ring.
Pull the magic ring closed.
Slip stitch into the top of the first dc.
Stitch count: 10 dc
Do not turn your work.
Round 2 — Expanding the Center
Chain 2.
Work 2 dc into every stitch around.
You should have:
2 dc in stitch 1
2 dc in stitch 2
2 dc in stitch 3
Continue around.
Slip stitch into the top of the first dc.
Stitch count: 20 dc
Your piece should now look like a small circle.
Round 3 — Creating the Leaf Direction
This round begins changing the circular shape into a longer leaf.
Chain 1.
Work the following sequence around:
sc in next stitch, 2 sc in next stitch
Repeat the sequence until you reach the beginning.
Slip stitch into the first sc.
Stitch count: 30 sc
Your piece should now be slightly larger and beginning to flatten.
🍃 PART 2 — BUILDING THE LEAF BODY
Round 4
Chain 1.
Work:
sc in next 2 sts, 2 hdc in next st
Repeat around.
Join with a slip stitch.
Stitch count: 40 sts
The extra stitches begin creating the wider body of the leaf.
Round 5
Chain 1.
Work the following sequence:
sc in next 2 sts, hdc in next st, 2 hdc in next st
Repeat around.
Join with a slip stitch.
Stitch count: 50 sts
At this point, your coaster should be approximately 3½–4 inches wide.
🍁 PART 3 — CREATING THE LEAF POINTS
Now we begin creating the characteristic pointed edges.
Do not worry if the first few points look uneven. The blocking step will help define them.
Round 6 — First Pointing Round
Chain 1.
Work the following sequence:
sc, hdc, dc, 3 tr, dc, hdc, sc
Repeat this sequence around the outer edge.
Each group creates one small pointed section.
When you reach the beginning, slip stitch into the first sc.
Fasten off if you want to change colors.
Tip
For a more dramatic autumn leaf, use a slightly darker shade for this round.
For example:
- Orange center + dark orange edge
- Yellow center + brown edge
- Green center + olive edge
🍂 PART 4 — DEFINING THE LEAF SHAPE
Instead of leaving the coaster as a simple circular arrangement of points, we will emphasize the top and bottom of the leaf.
Choose one point to become the bottom tip.
This will be the point where the stem is attached.
The opposite point becomes the top tip.
🌿 Bottom Leaf Tip
Place your coaster flat.
Find the point you want to use as the bottom.
Insert your hook into the center of that point.
Attach your yarn.
Chain 1.
Work:
sc, hdc, dc, 3 tr, dc, hdc, sc
into the same general point area.
Slip stitch down toward the center.
This reinforces the bottom point and makes it more defined.
Fasten off.
🍁 Top Leaf Tip
Rotate your coaster so the opposite point is facing you.
Attach yarn at the point.
Chain 1.
Work:
sc, hdc, dc, 3 tr, dc, hdc, sc
around the point.
Slip stitch back toward the center.
Fasten off.
Weave in the ends.
🌿 PART 5 — CENTER LEAF VEIN
The center vein gives the coaster a more recognizable leaf appearance.
Use a contrasting color or the same color as the coaster.
Turn the coaster so the wrong side is facing you.
Attach yarn at the bottom point.
Chain 1.
Work a line of slip stitches from the bottom point toward the center of the leaf.
Continue toward the top point.
Try to keep the line straight.
Fasten off.
Alternative
For a raised vein, use single crochet through the surface instead of slip stitches.
This creates a more visible ridge.
🌱 PART 6 — SIDE VEINS
For a more detailed leaf, add smaller veins branching away from the center.
Attach yarn near the center vein.
Create a short diagonal line using slip stitches.
Repeat on the opposite side.
Continue creating 3–4 pairs of veins.
Keep the veins progressively shorter as you move toward the leaf tip.
Suggested arrangement
Bottom:
long vein
↓
medium vein
↓
short vein
↓
shorter vein
This gives the coaster a more natural leaf appearance.
🌿 PART 7 — THE STEM
Now make the small stem.
Attach yarn to the bottom tip.
Chain 7.
Starting in the second chain from your hook:
- Slip stitch in the next 2 chains
- Single crochet in the next 2 chains
- Half double crochet in the next chain
- Slip stitch in the final chain
Slip stitch back into the base of the leaf.
Fasten off.
Weave the yarn through the back of the stem and secure it.
Stem adjustment
Want a longer stem?
Simply chain 9–10 instead of 7.
Want a shorter stem?
Chain 5–6.
✂️ PART 8 — WEAVING IN ENDS
Use your yarn needle to weave every loose yarn end through several stitches on the back.
Change direction once or twice.
Trim the excess yarn.
Do not cut the yarn immediately next to the stitch because the end can work itself loose.
💧 PART 9 — BLOCKING
Blocking makes a big difference to the final appearance.
Lightly dampen the coaster with water.
Place it on a towel or blocking mat.
Gently arrange the leaf into shape.
Pull the points outward slightly.
Make sure the center remains flat.
Pin the points if necessary.
Allow the coaster to dry completely.
Remove the pins.
Your leaf should now have a cleaner, more defined silhouette.
🍂 FINISHED COASTER
Your finished coaster should have:
✓ A rounded central body
✓ Multiple pointed leaf edges
✓ A defined top and bottom point
✓ A small stem
✓ A central vein
✓ Optional side veins
✓ A flat surface suitable for a mug or glass
🎨 AUTUMN COLOR COLLECTION
For a coordinated set of six:
🍁 Maple Rust
Warm rust orange
🌻 Golden Harvest
Mustard yellow
🍂 Autumn Red
Deep reddish-orange
🌿 Olive Leaf
Muted olive green
🤎 Woodland Brown
Warm brown
🧡 Burnt Pumpkin
Deep pumpkin orange
Mixing these colors together gives the set a natural autumn palette.
☕ MAKING A SET
For a complete coaster set, make 4, 6, or 8 leaves.
For example:
4-Piece Set
- Rust
- Mustard
- Olive
- Brown
6-Piece Set
- Rust
- Mustard
- Red
- Olive
- Brown
- Pumpkin
8-Piece Set
Make two of each of the four main colors.
💡 SIZE VARIATIONS
Smaller Leaf
Use:
- DK-weight cotton
- 3–3.5 mm hook
Stop after the main body and use fewer outer points.
Standard Leaf
Use:
- Worsted-weight cotton
- 4 mm hook
Follow the complete pattern.
Larger Decorative Leaf
Use:
- Chunkier cotton yarn
- 5–6 mm hook
Increase the number of stitches in the center rounds before creating the outer points.
🧼 CARE INSTRUCTIONS
Cotton is recommended because it is practical for coasters.
For everyday cleaning:
- Hand wash gently or use a gentle machine cycle.
- Reshape while damp.
- Allow to air dry.
- Avoid excessive heat.
Always follow the washing instructions for your particular yarn.
🍁 FINAL TIPS
Keep your tension consistent.
Loose, even stitches produce a flatter coaster.
Don’t worry about tiny imperfections.
Handmade leaves naturally have slight variations, which can make each piece look unique.
Block the finished coaster.
This is especially useful if your points curl or the coaster isn’t perfectly flat.
Experiment with colors.
Autumn leaves don’t have to be orange. Olive, cream, mustard, burgundy, rust, and brown all work beautifully.
Make every leaf slightly different.
Changing the colors and vein placement can make a finished set look more natural and handmade.