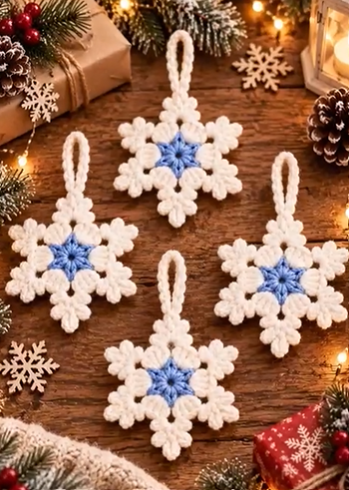
Add a handmade touch to your Christmas decorations with these beautiful crochet snowflake ornaments. Featuring a soft white snowflake with a delicate blue star-shaped center, these ornaments are festive, elegant, and perfect for decorating your Christmas tree, holiday garlands, windows, gifts, or winter displays.
This crochet snowflake project is also a wonderful choice for handmade Christmas gifts. The pattern uses basic crochet techniques combined with simple shaping, making it an enjoyable project for beginners who are comfortable working in rounds.
Materials You’ll Need
- White medium or light-weight yarn
- Blue yarn for the center
- Crochet hook suitable for your yarn
- Yarn needle
- Scissors
- Stitch marker
- Optional fabric stiffener or starch
Crochet Abbreviations
- CH – Chain
- SC – Single Crochet
- HDC – Half Double Crochet
- DC – Double Crochet
- TR – Treble Crochet
- SL ST – Slip Stitch
- ST – Stitch
- SP – Space
- REP – Repeat
Finished Size
The finished crochet snowflake measures approximately 4–5 inches (10–13 cm) across, depending on your yarn, hook size, and crochet tension. You can easily create smaller or larger ornaments by changing the yarn weight and hook size.
Round 1 – Create the Blue Center
Using blue yarn, make a magic ring. CH 2, then work 12 DC into the ring. Pull the center closed and join with a SL ST to the first stitch.
This creates the foundation for the small blue star in the middle of the snowflake.
Round 2 – Form the Blue Star
CH 1. Work a combination of SC, HDC, and DC stitches to create six small points around the center. A simple repeat is: SC, HDC, DC, HDC, SC across the appropriate stitches or spaces.
Repeat the sequence evenly around the center until you have six blue points. Join with a SL ST and fasten off the blue yarn.
Round 3 – Add the White Yarn
Attach white yarn between two points of the blue star. CH 3 and work a small cluster of DC stitches into the same space.
CH 2, then work another cluster into the next space. Continue around the center, creating six evenly spaced white sections.
Join the final section to the beginning with a SL ST.
Round 4 – Create the Snowflake Arms
SL ST into the next chain space. CH 3, then work several tall stitches into the same space to begin forming the first snowflake arm.
Work a combination such as 2 DC, CH 3, 2 DC into each chain space. The CH-3 section creates the pointed shape at the end of each snowflake arm.
Repeat this sequence around until all six main arms have been formed.
Round 5 – Decorative Snowflake Points
For the final round, work along each snowflake arm using SC and small chain loops.
When you reach the tip of an arm, work CH 3, SL ST into the first chain to create a small picot. You can add additional picots on either side of the main point to give the snowflake its detailed crystalline appearance.
Continue around all six arms, keeping the decorative points as symmetrical as possible.
How to Make the Hanging Loop
After completing the final snowflake arm, do not immediately fasten off. Instead, CH approximately 20–25 stitches.
Bring the chain back toward the snowflake and join it to the same point with a SL ST. This creates a simple crochet hanging loop.
Fasten off and weave the yarn end securely into the back of the ornament.
Blocking the Crochet Snowflake
Blocking is especially useful for crochet snowflakes because it helps define the individual points and gives the ornament a clean, symmetrical appearance.
Lightly dampen the finished snowflake and pin each of the six points into position on a blocking mat. Allow it to dry completely before removing the pins.
If you prefer a firmer Christmas ornament, apply a small amount of fabric stiffener or starch before blocking.
Color Ideas for Your Snowflake Ornaments
The classic white and blue combination creates a beautiful winter-inspired appearance, but these ornaments are easy to customize.
- White and silver for an elegant winter theme
- White and gold for traditional Christmas décor
- Red and white for a candy-cane-inspired look
- Ice blue and white for a frosty winter style
- Cream and champagne gold for rustic Christmas décor
- Pastel colors for a softer modern Christmas tree
How to Use Crochet Snowflake Ornaments
Hang your finished snowflakes directly on your Christmas tree, arrange several along a festive garland, or use them to decorate windows and holiday wreaths.
They also make beautiful handmade gift toppers. Attach a small crochet snowflake to a wrapped Christmas present with ribbon or twine, and the recipient receives both a decorative package and a reusable handmade ornament.
Tips for Beautiful Crochet Snowflakes
Keep your crochet tension consistent throughout the project so all six points remain similar in size. Count your stitches carefully during each round because symmetry is especially important when creating snowflake motifs.
After finishing, gently shape every point before blocking. If you are making several ornaments for the same Christmas tree, use the same yarn and hook size so the finished snowflakes have a coordinated appearance.
Make a Complete Christmas Snowflake Set
Once you have completed your first ornament, crochet several more to create a matching handmade Christmas collection. You can alternate the center colors while keeping the outer snowflakes white, or create an entire set using one consistent winter palette.
These lightweight ornaments are easy to store and can be reused every holiday season, making them a lovely addition to your handmade Christmas décor.
Final Thoughts
These Crochet Snowflake Ornaments combine a simple handmade design with classic winter charm. The blue star center adds a beautiful touch of color while the textured white points create the recognizable snowflake shape.
Whether you use them as Christmas tree ornaments, handmade gifts, garland decorations, or festive gift toppers, this free crochet snowflake pattern is a fun project to add to your holiday crochet collection.